How Can We Help?

The NavStation ChartStore carries many of the same great ChartWorld charts and manages them for you automatically. See our charts page for more details or check in app (File -> NavStation ChartStore). We carry all ChartWorld branded charts and C-MAP Professional + charts with no uplift. These charts provide world wide coverage and by far have the simplest user experience since we automate all installation and updates.
There are some we do not carry, notably the Official National Hydrographic Office ENCs and some inland waterway charts in foreign languages.
If you need those types not carried in our ChartStore, you can manually configure a vessel in ChartWorld, purchase, download, and install in MacENC. ChartWorld direct and NavStation ChartStore charts can live together seamlessly in MacENCx64. Below are the details on how to do the manual setup.
Chartworld.com (www.chartworld.com) has a great selection of chart content for sale.
MacENCx64 supports S-63 digital charts as a registered ECS (Electronic Chart System) manufacturer with the IHO (International Hydrographic Organization).
Chart providers (Chartworld) encrypt their chart content in a way specific to the ECS (MacENCx64) so that only trusted systems can access and use the charts.
Here is how you set up your Chartworld account, purchase, install, and use charts in MacENCx64.
Navigate to Chartworld (www.chartworld.com). On the main screen at the upper right, you will see a link for ePORTAL. This is your start place not only to begin account creation abut also to log in to your account once created.
When shopping later, always login first, then select your installation (more on this later), and then search and buy.
For now, let’s go set up your account.
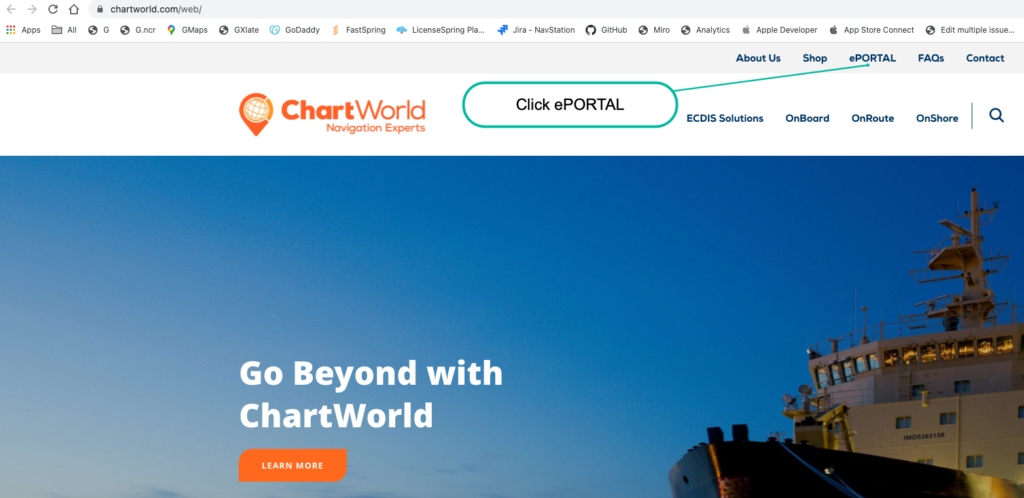
Select ePORTAL. Once done, you will see the next screen that gives you the option to login with an existing account or register a new one. In this case we’ll register now.
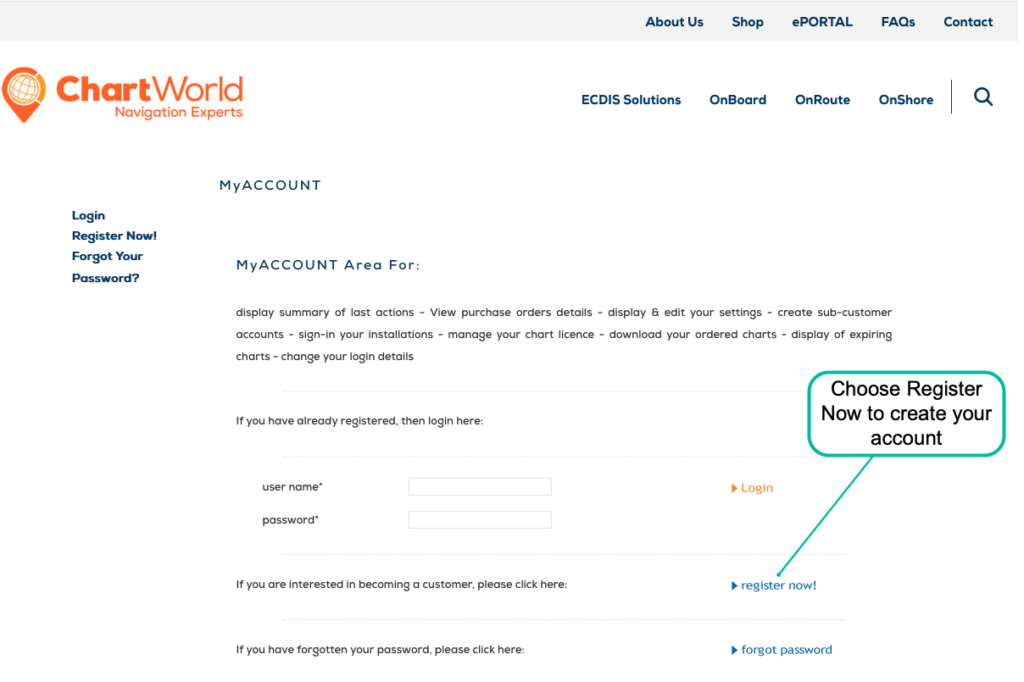
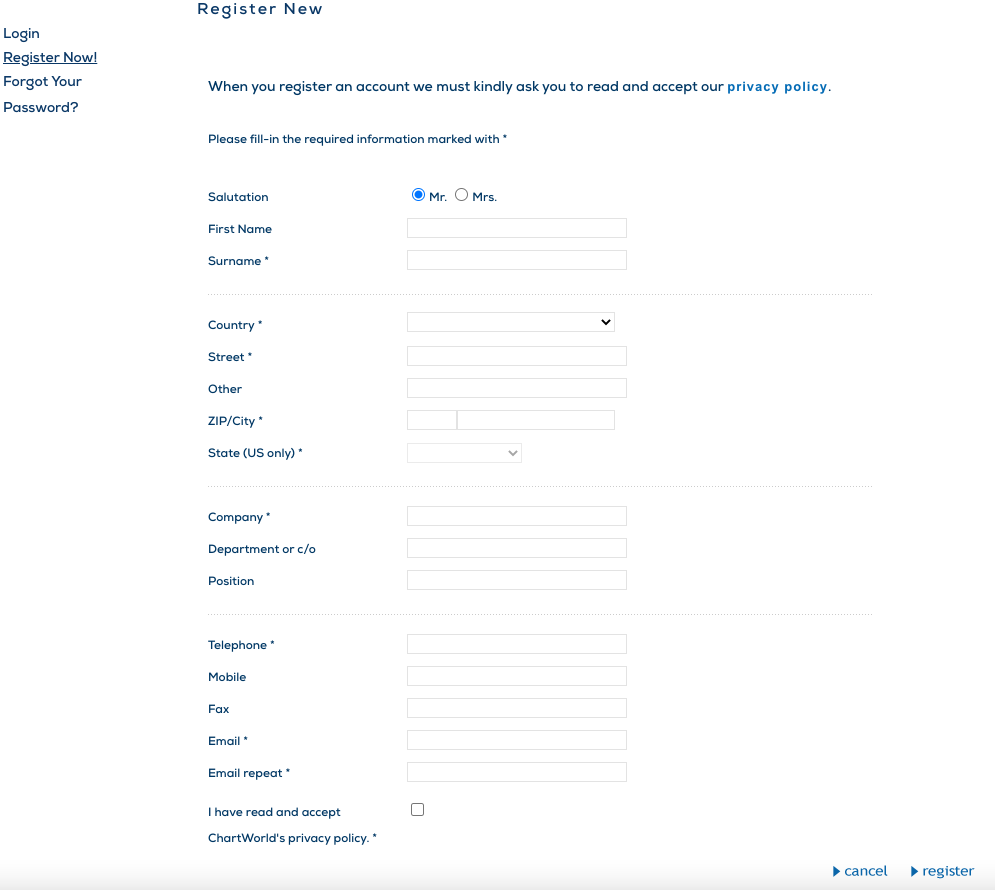
Now it’s time to create your account. The fields are the standard account type information so just fill them out and complete the setup.
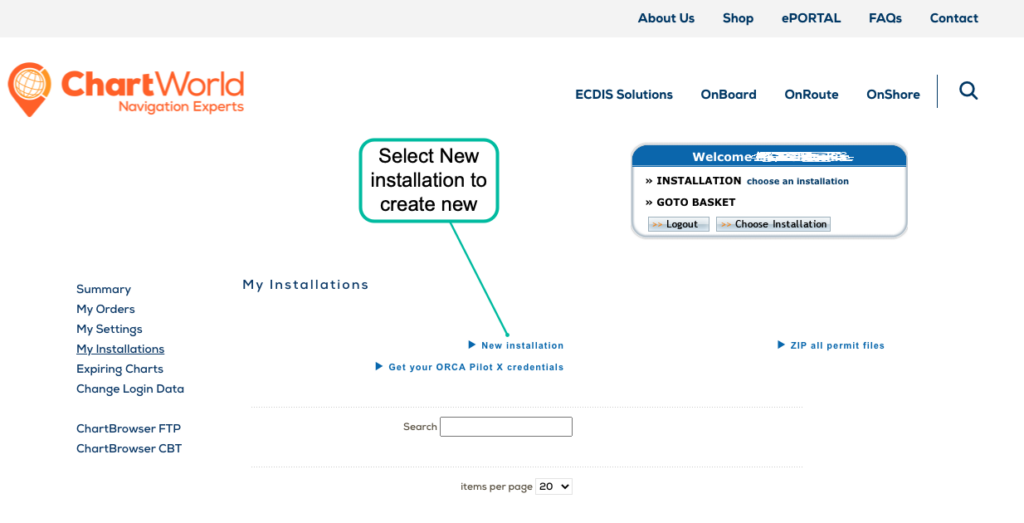
Once you have created your account you will presented with a screen showing what (if any) installations you may have and options to create a new installation.
Installations are essentially your vessel. In this case the MacENCx64 version of your vessel. You only need one [Installation] per copy of MacENCx64. You might have multiple actual vessels, but we are here talking about the ECDIS computing systems. Not the physical boats you own. So, in short: 1 Mac Computer + 1 Copy of MacENCx64 = 1 Vessel.
We want to create an installation so let’s choose New Installation on the screen.
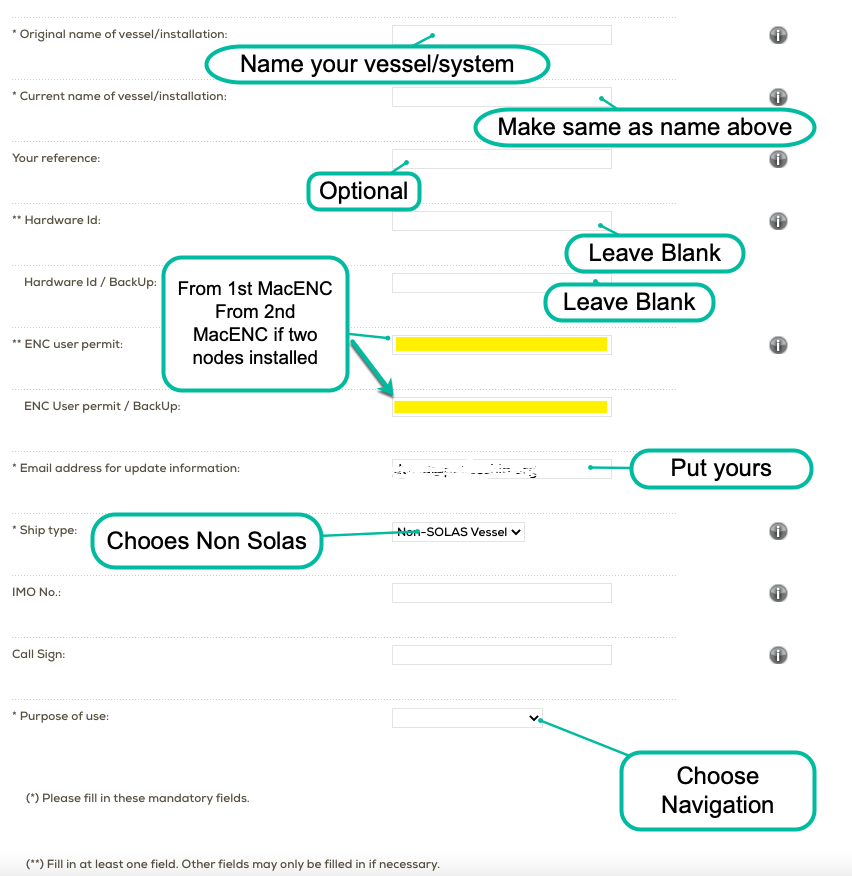
The installation is the key thing. This is where you connect your MacENC hardware signature to the chart encryption service.
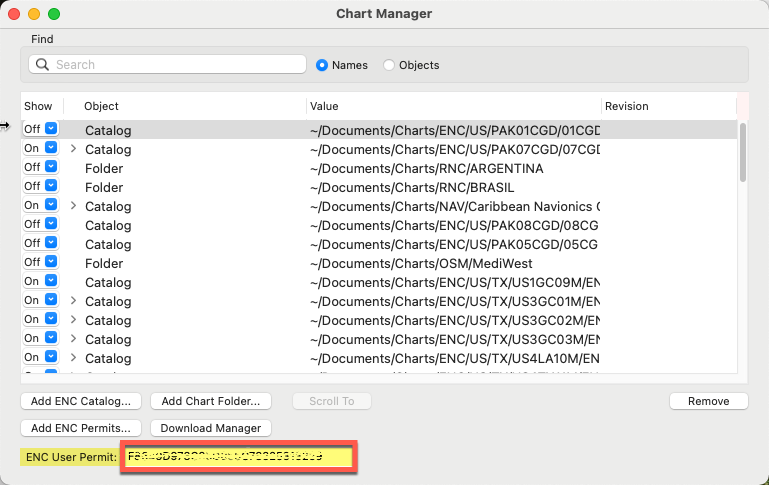
See the picture below for some guidance on completing the form. The important element is the ENC User Permit field: MacENCx64 creates this permit code for you based on the Hardware signature of your Mac. From within MacENC, choose File => Chart Manager, then see at bottom the ENC User Permit. It will be in the box, alpha numeric, and roughly 28 characters long. Copy this and past the code into the field in Chartworld.
MacENCx64 is a two node license. That means you can run one copy on two computers. Either as a backup or one on-board and one at home.
Chartworld also supports two installs. They call this BACKUP. When you are creating the installation, you will need the ENC User Permit number from each of your different copies of MacENCx64 ready ahead of time.
After you complete the create installation form, you will arrive at the main ePortal screen again; but, now you will see the new installation at the bottom. If you have multiple installations, you will see them listed in the table.
In the case of your new single installation, you should now click the “select” link. That will change the status in blue box in the upper right. The INSTALLATION item will have your named installation item listed.
Whenever you go shopping, you want to start here first and verify that your INSTALLATION is selected and showing up in that status box. See the screenshot below:
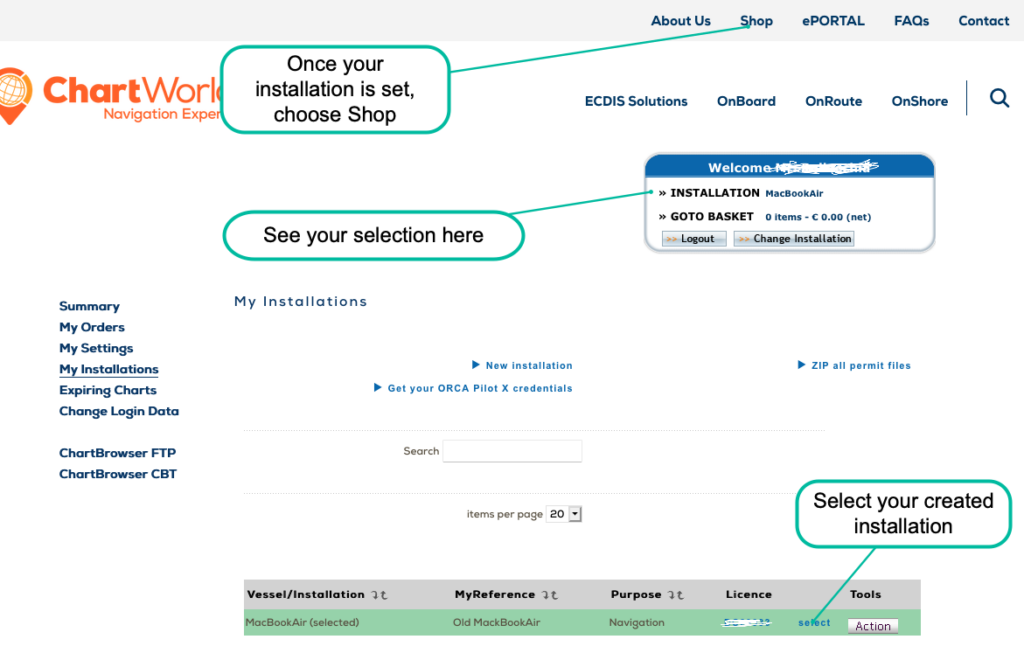
Your account and installation are now setup. You can browse, search, and purchase charts now. You will always choose ePORTAL first and login. Verify your installation is selected, then you can shop. Click Shop link upper right.

The Shop screen gives you a few ways to select. You can narrow by chart type from the list of links on left, search for specific charts in the search charts box, or browse using the graphical chart selection tool.
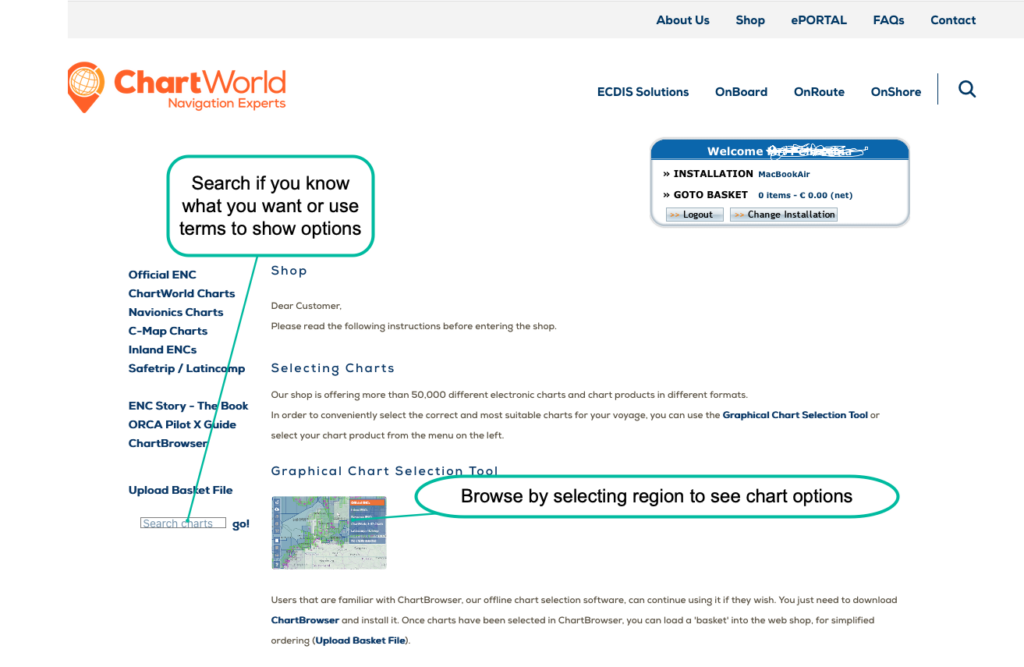
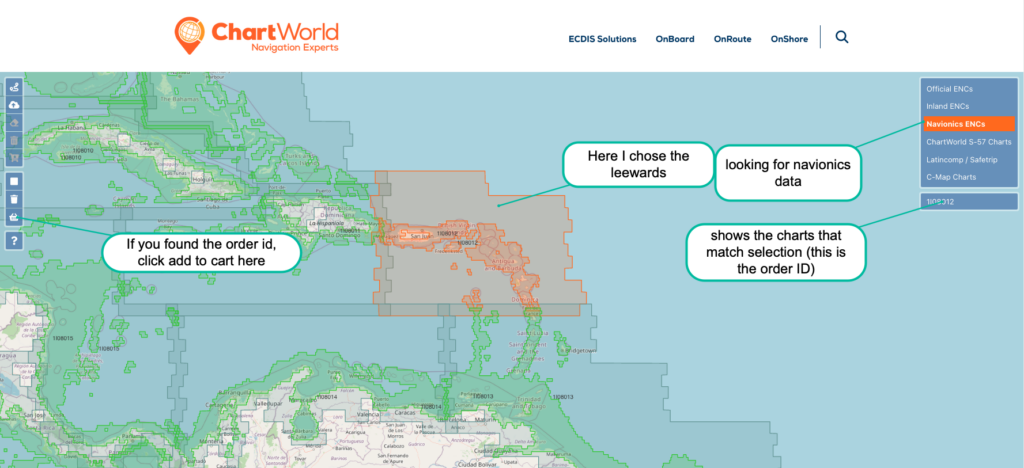
For this how-to, let’s use the graphical tool. You can navigate the world map and select chart types in the upper right selection box.
Selecting an area and chart type will show a product or order ID depending on selection. You can use that number to search directly. This is Chartworld’s product ID. In this case, I’ve selected the Caribbean Leeward islands (since I already have the Windwards charts, I’d like to complete the set). I very much trust the Navionics data so I’ve chosen Navionics ENCs and then on left side icon ribbon, click to add to cart.
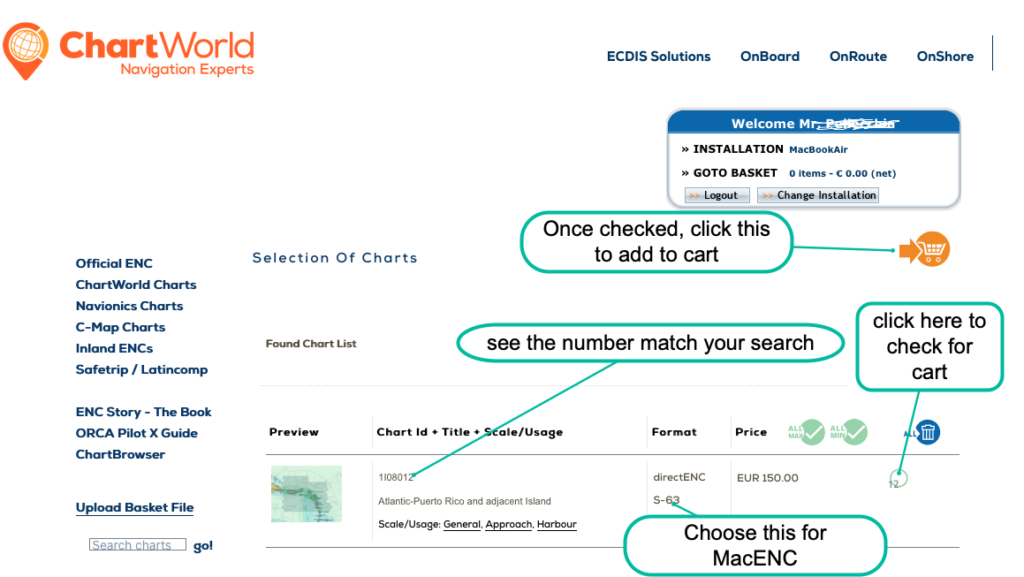
Once returned to the main screen you will see one or more charts (depending on selection). There will be chart ID, title, scale, etc. There are format options. Choose S-63 for MacENC. The far right will have a circle. Click for each chart you want to move to cart. A check mark will be highlighted once you do.
Once all selected, click the orange arrow and cart icon in the upper right to add.
The GOTO BASKET item in the status area will show how many items you have and their cumulative net price.
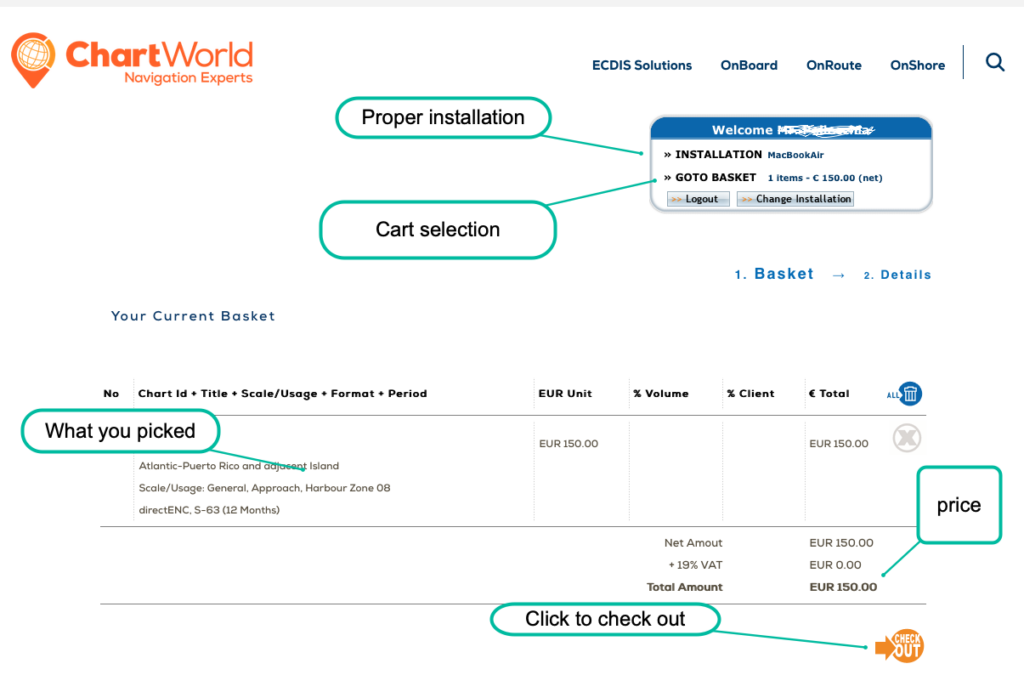
Now you will be in the cart, see the total and any tax. You can remove items added by mistake (see gray X). Otherwise, all is good, time to check out.
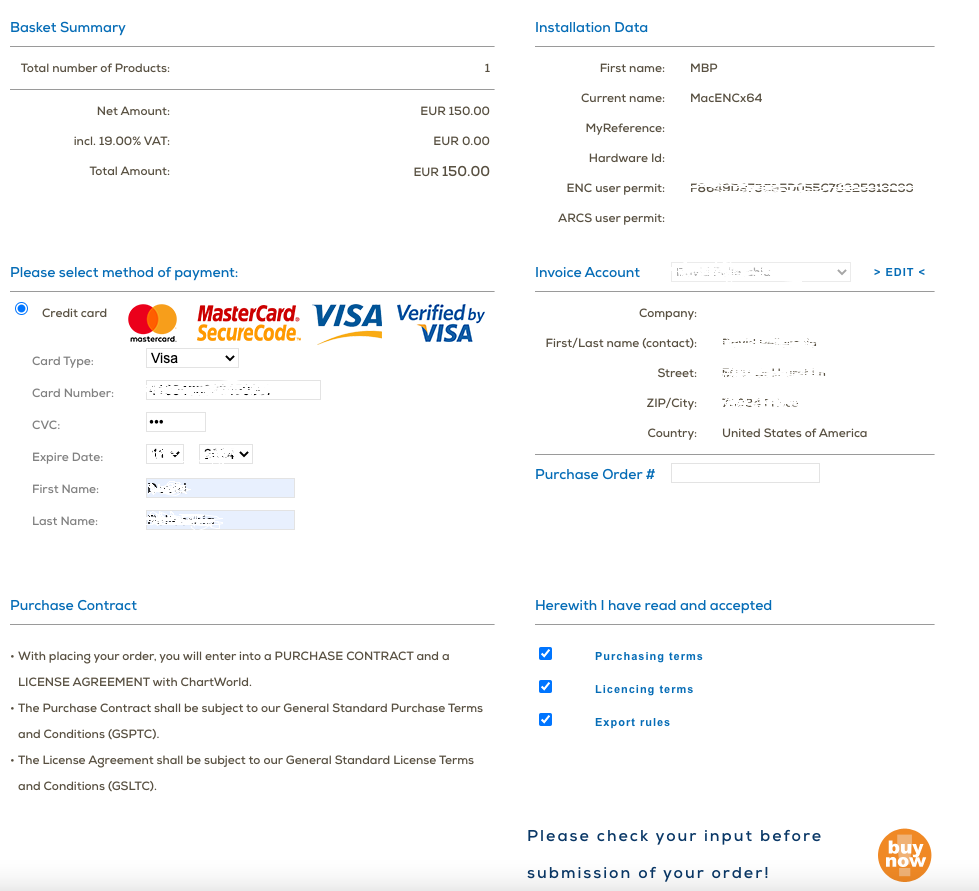
This takes you to a standard purchase page. Just fill out the needed info and check the three items under “herewith I have read and accepted” section. Then Buy Now!
Your order finished page will show the completed transaction and a download button (blue circle with white down arrow) to get your charts.
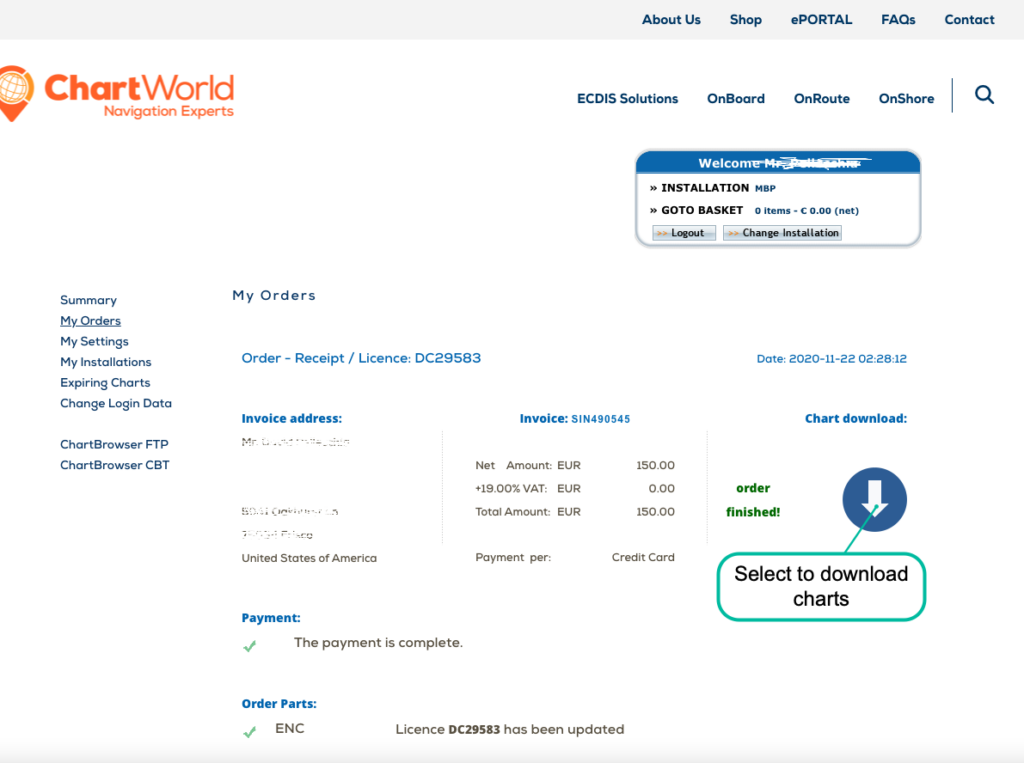
Clicking the download button brings you to a page with an FTP link. A message will show asking if you want to open it in Finder, tell it YES and you’ll be in the ftp download directory but in your familiar finder window.
Why macOS is so cool is that it’s based on unix and so powerful internetworking is just built right in, like Finder able to use an ftp folder natively. (ok, turning geek mode off)
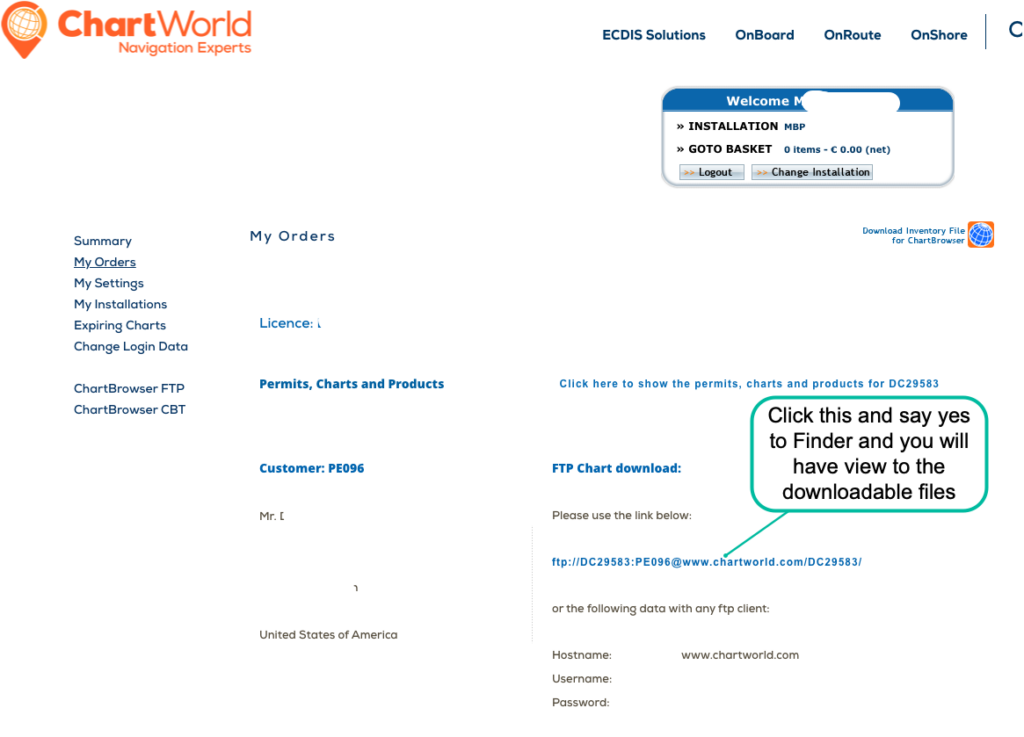
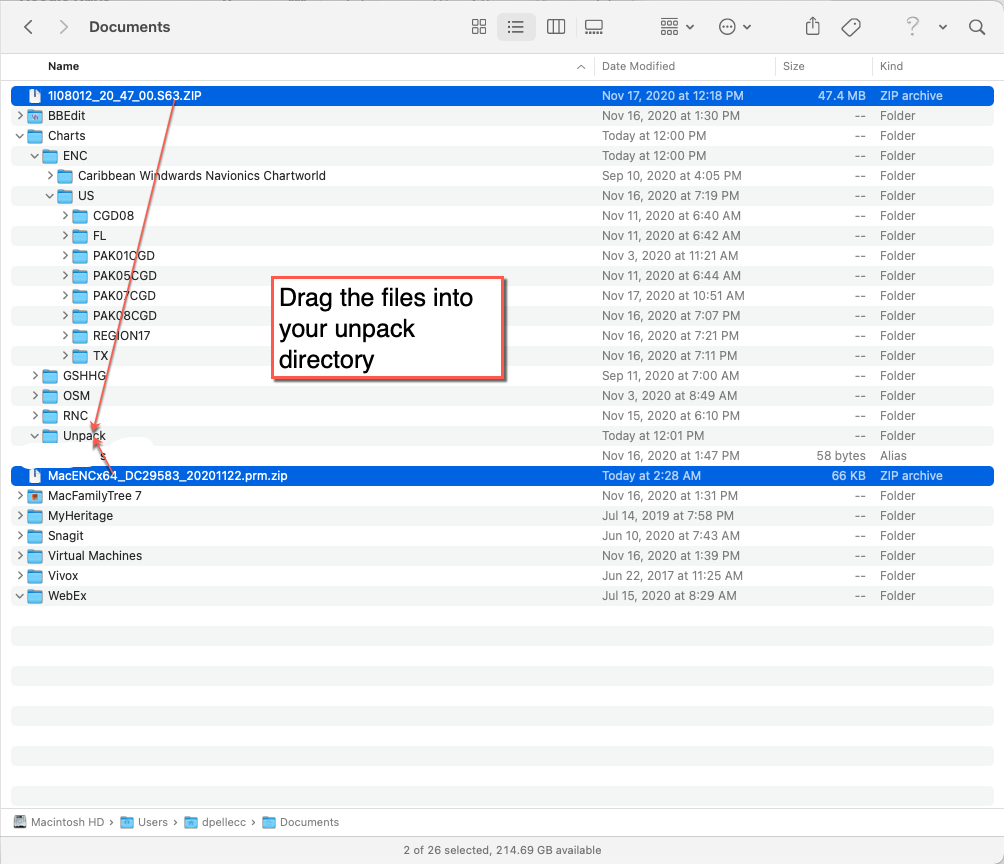
Finder will show you a list of files. At minimum, there will be two:
If you have been active for a while and have multiple charts purchases, all of your active chart zips will be here too. Just grab the permit and chart zip you need and drag them to where you want to work with.
I prefer to keep my stuff in Documents the folder. I keep my Chart folders there too. For this demo, we’ll drag the zip files into Documents.

Move Files & Manage Folders: Files moved, you can kill the FTP tab in Finder.
Navigate to your Documents folder (or your preferred location). Here is mine. You will note I have a Charts folder where I store and organize my nav charts. Care and feeding of your files and folders always pays dividends.
Besides the charts folder I have an Unpack folder that I use for what we are working on now. Unpacking recently downloaded files. So Move the two files into Unpack.
Now you can navigate to the Unpack folder and double click each of the two zip files. They will extract into folders where you can examine the contents.
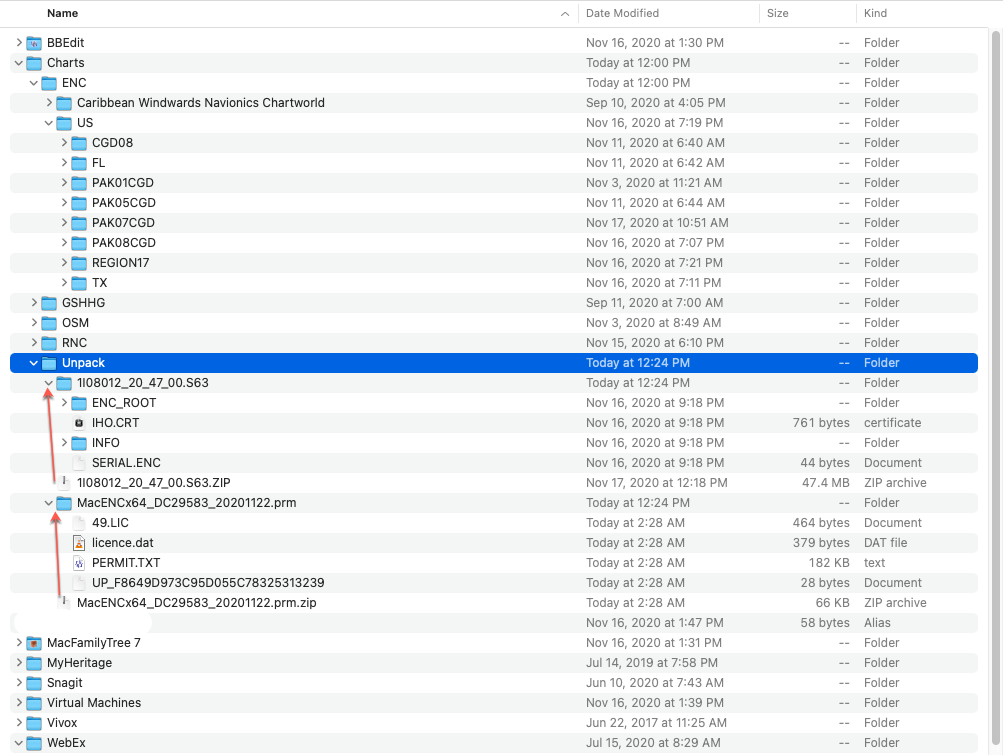
We need a place to move these guys and this is where chart and folder organization come back in to play.
Beneath the chart type (e.g., ENC and RNC). I have folder names that are descriptive. I start them with the location. So you will notice a /US folder where I keep my NOAA ENCs. Beneath that each region or state or coast guard district chart pack gets a descriptive folder.
The best way to think of this is:
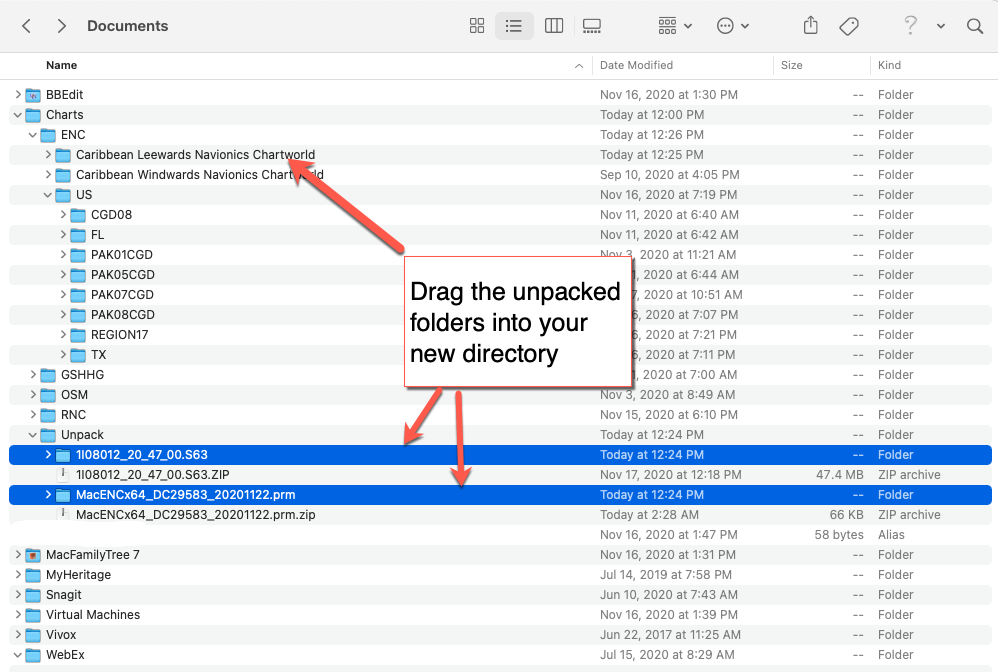
In this case, I have the Caribbean Windward isles already and I have just purchased the Leewards, so I’ll name it similarly and create a new folder under ENC, then name it. See two screen shots below.


Now that we have our target folder all set up, it’s time to drag our two folders from Unpack into our new directory (just the folders not the zips)
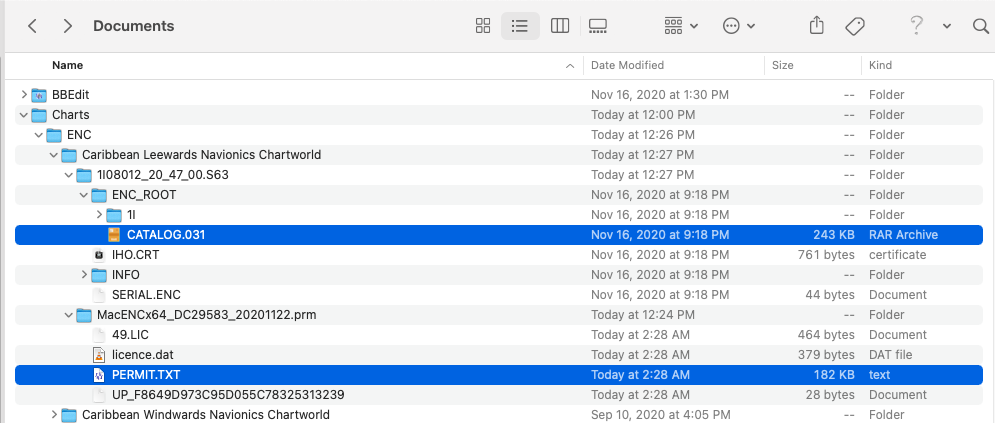
Expand and verify: Open the folder you had created and moved your files into. Open them and their sub-folders until you can find two key files: For the charts, CATALOG.031 file and, for the permit, the PERMIT.TXT. Leaving these expanded in Finder will help you later on when adding to MacENCx64. For now, just make sure your files and folders got where you wanted them.
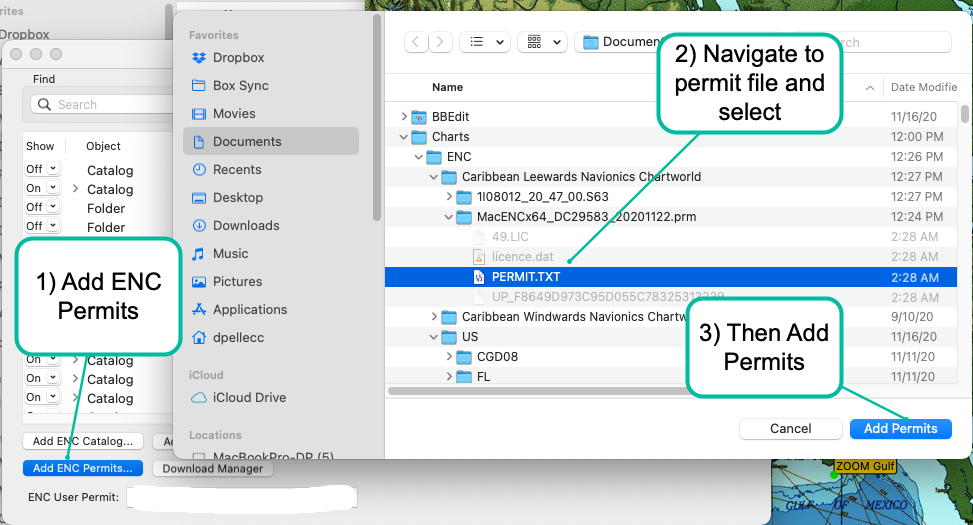
Add to MacENCx64: Start MacENCx64. Choose File => Chart Manager. At the bottom of Chart Manager see and click on the [Add ENC Permits…] button.
That will open a Finder window. Navigate to your Charts folder and if you have left the subfolders opened you will see the PERMIT.TXT file all ready for you.
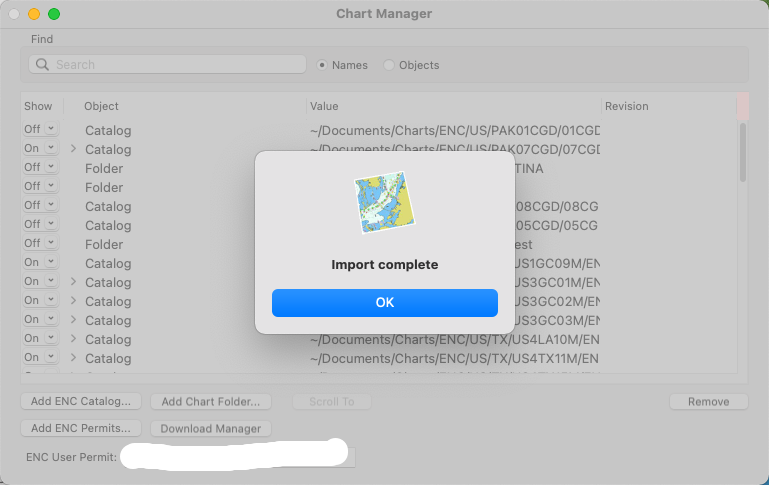
Select that file, then press the [Add Permits] button. MacENCx64 will notify you of successful permit import.
Add ENC Catalog: Back at Chart Manager, now select the [Add ENC Catalog…] button.
Again a Finder window will appear and you can navigate to the chart folder where the CATALOG.031 file is. Select that, then press the [Add Catalog] button.
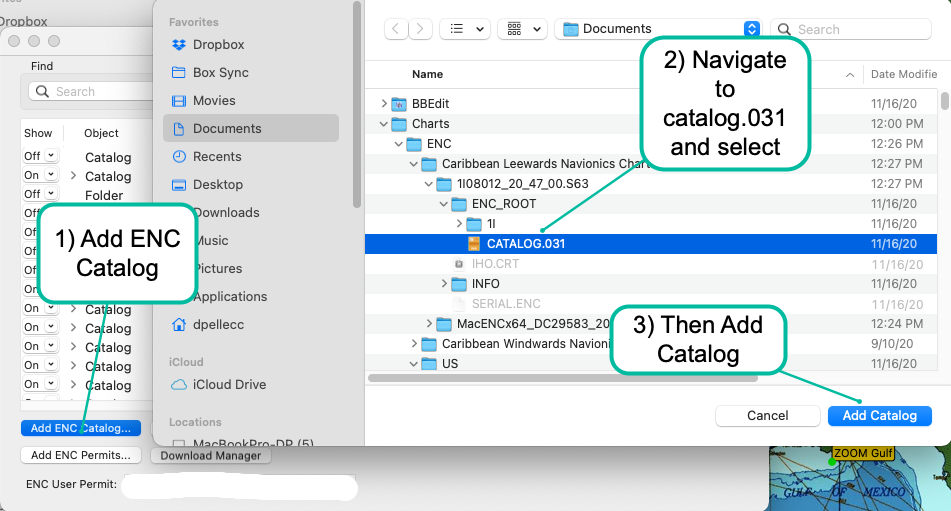
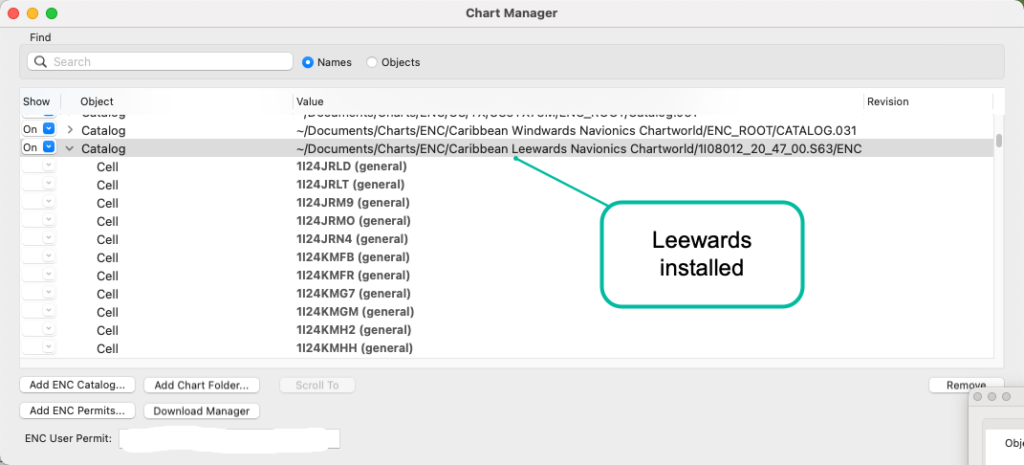
Chart Manager will now show the newly installed chart catalog and the cells beneath. The catalog will default to Show=On. Our new charts are now installed! Head over to the chart window to verify.
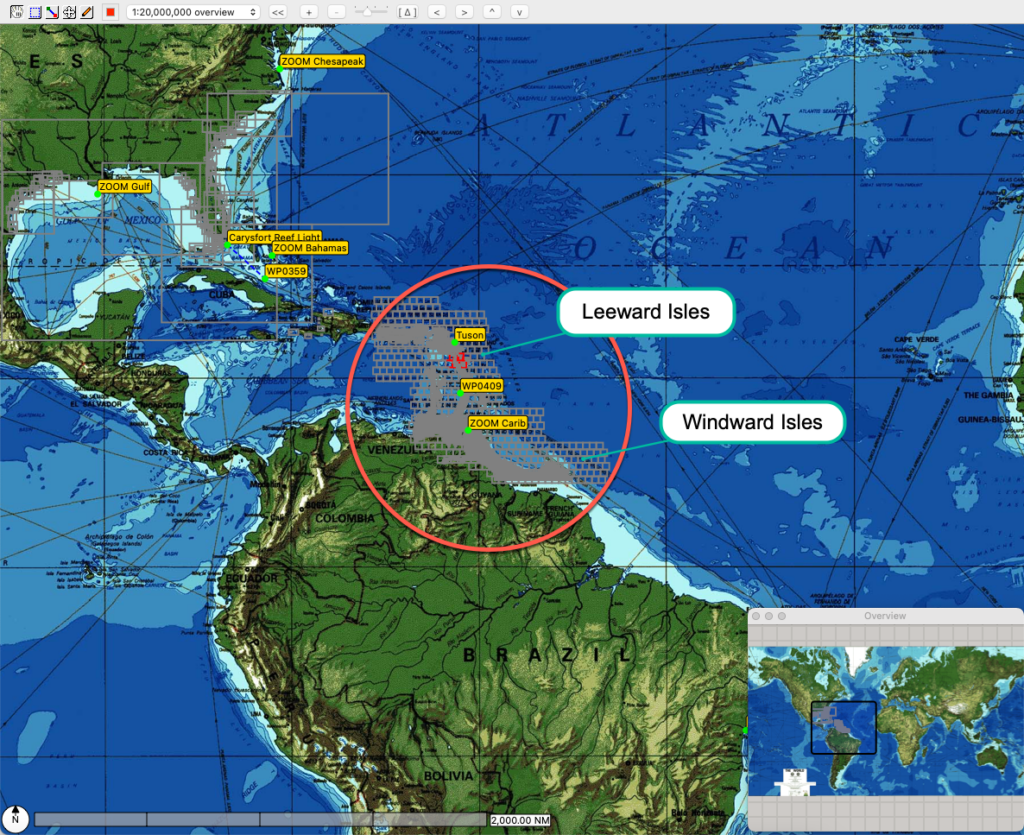
Verify Charts: Go to the main chart display window. Choose from the View menu, Bounds. (check mark for boundaries will be on).
Note the gray boxes around all installed charts. In this case, you can see my original Windward isles charts and now above them the Leewards.
You can turn off View => Bounds. (helps improve render performance).
Zoom in and voila! Ready to sail.
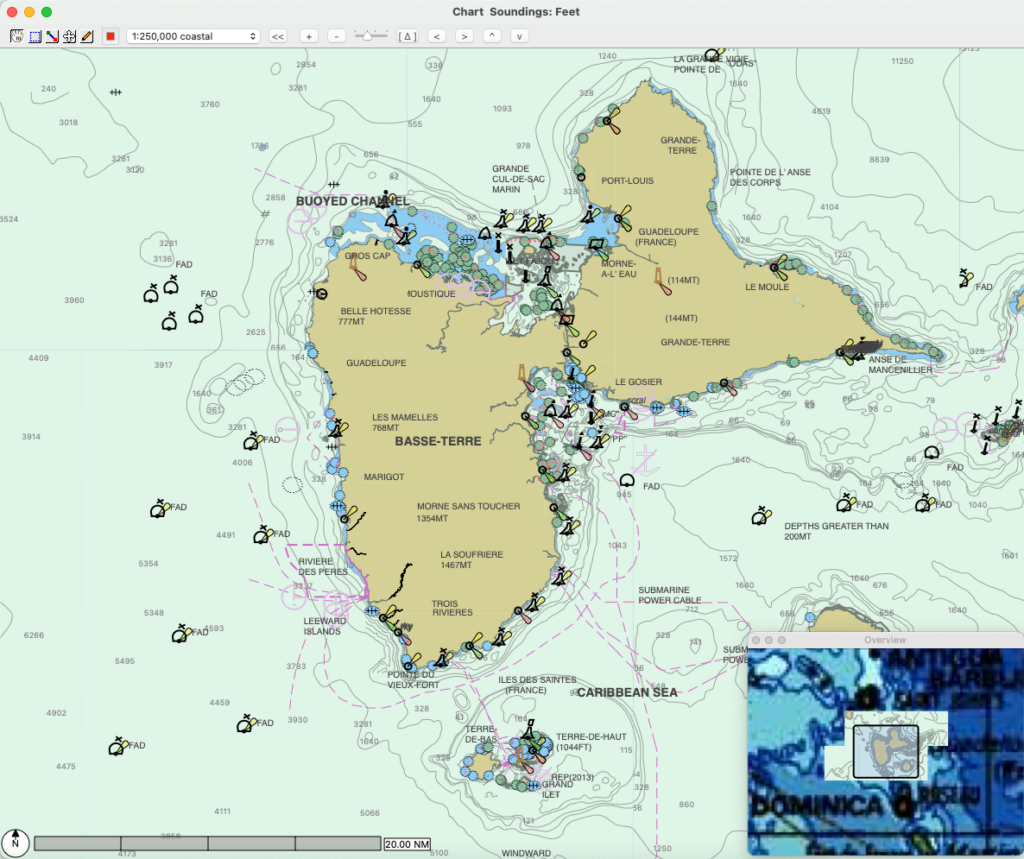
That’s it!
Chartworld will periodically send you emails letting you know if there are any new/updated charts. They will always send you copies of your permit files in these messages in the event you’ve lost your original.
You won’t need to add your permit files again. That is a one time event and MacENCx64 has it stored for you.
New chart updates can be downloaded and used to replace your old charts.
Now is a good time, having verified all is installed, to clean up your Unpack folder… move those zip files to trash.
Hope this helps and happy sailing!
